Here is a video of our group practicing lip syncing to our chosen song. We will at a later date add the actual song to see whether the lip syncing in in sync with the song.
Friday, 27 January 2012
Tuesday, 24 January 2012


Digipack
for my digipack I decided that we liked the idea of having us in black and white and the colour of our dresses will be in colour. This was inspired by the saturdays as they have different coloured dresses and we thought that this was a good idea as it shows we are a girl band.
I have edited a picture on photoshop and created the picture I thought will look interesting on our digipack, here is my idea.

I have edited a picture on photoshop and created the picture I thought will look interesting on our digipack, here is my idea.

Friday, 20 January 2012
Photoshop tutorial
Me and my group had a photoshop tutorial which really helped us. We can now use photoshop and use different effects which will help us with out digipacks and magazine adverts. We wanted to know how to make an image black and white but have certain items with an outburst of colour. I figured out how to do this by researching on the internet. I found some useful tips which didn't take me long to figure out how to use the tools on photoshop. If I am not too sure how to use certain tools on photoshop I will research this. I think that this will widen my knowledge of photoshop which will help me in the future.
The below pictures show the step by step guide which I used to help me with the process.


Read more: http://www.digital-photography-school.com/mono-with-a-dash-of-colour-photoshop-cs2-tutorial#ixzz1jzZ9AoyN
The below pictures show the step by step guide which I used to help me with the process.
1) Open the file and select IMAGE>ADJUSTMENTS>DESATURATE to remove all colour from the image. Please note that the file is still RGB. We must not turn the colour mode to Mono or the next bit won’t work.
2) Select the History Brush from the tool palette (2a). Then make your brush size around 10 – 11 px using the palette located just under the file menu bar (2b). Hardness should be 100%.

3) Using the History Brush we can now “paint” back in time to when our image was in it’s full colour glory. Remember and lift off now and then so you can undo any mistakes without having to start again.
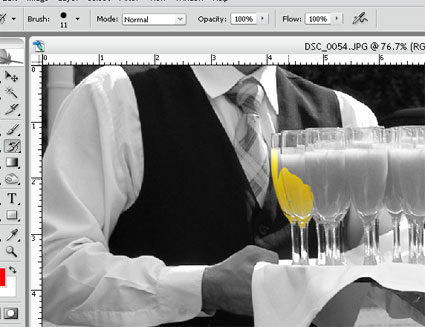
4) Continue the process until the area is complete. Take extra special care by zooming in when necessary. I found the area near the ladies hand needed this treatment.
And that’s it!
The secret is just to take your time during the painting process and be careful around the edges. Use any size of brush (and indeed, more than one size) for each job that you are comfortable with.
Read more: http://www.digital-photography-school.com/mono-with-a-dash-of-colour-photoshop-cs2-tutorial#ixzz1jzZ9AoyN
Photos for digipacks
We booked out the studio to take pictures for our digipacks and for the magazine advert. We used a DSLR camera which took high quality photos which we are all happy with.


Filming - Wednesday 11th January 2012
We started to film on the 11th January 2012 and we got some filming done. We have to re-film some of the scenes because we were not in sync with each other as we wanted to sway side to side to make the filming more interesting. Also by having these movements makes it look more of a girl group, which we desired to do.


Friday, 13 January 2012


Started Filming!
On wednesday 11th we started to film our music video and got various shots for our performative lip syncing. We had four mic stands with microphones and played the music from our phone. We got some scenes where we were lip syncing to the song which we will upload soon.
It was quite hard to lip sync as some of us didn't know the song well and got some of the words mixed up. Also we tried to be in sync with each other by having a dance routine; swaying side to side to make the scene more interesting and more in sync.
We are going to film more scenes to create our music video by using narrative scenes to it. We hope that our music video goes well and all goes to plan!
Wednesday, 11 January 2012
Equipment
 |
| This is a tripod which securely holds the camera in place and also keeps the camera still when filming. |
 |
| This is the green screen studio where we will be filming the performative scenes. |
 |
| This is a DSLR camera which we will be taking photos for our digipaks. This camera will give the best quality for our photo as you can focus in. |
 |
| This is a Sony HD camera which we will be using for all our scenes. This video camera gives the best quality for our scenes and the quality looks best in the end result. |
Equipment booking/ location booking
On Wednesday 11th January we have booked the studio to do our performative scenes to the chorus of the song. We have booked the studio for three hours which we hope to get most of our performative scenes done!
We have also booked a professional video camera to film the scenes, this is because the camera quality is high and has effects which can come in handy when filming.
We have also booked a professional video camera to film the scenes, this is because the camera quality is high and has effects which can come in handy when filming.
Permission to film
We had to gain permission because we are using students from outside the academy so we had to ask our teacher for permission. We asked our media teacher, this is because of health and safety reasons.
The below pictures show us getting the permission:


The below pictures show us getting the permission:


Lip Syncing
I looked online and found some useful tips and ideas which may work when lip syncing to the song. I think that some of the tips may work but it is useful to know the song you are lip syncing too!
These tips may help us when lip syncing, it is just remembering the lyrics and when they come in.
- Memorize and mouth the lyrics. The least you can do if you can't actually sing them is to have them memorized. This will make it easier to match the movements of your mouth with what is supposed to be sung.
- If lyrics to the song are unknown, repeat the words "watermelon and cantaloupes" or "carrots and peas" over and over to the rhythm of the song. It works most of the time!
- Don't immediately give up. Practice everyday so your performance will eventually be good enough to sing for real.
These tips may help us when lip syncing, it is just remembering the lyrics and when they come in.
 |
| The Saturdays on stage. |
Tuesday, 10 January 2012


Meeting Minutes - 10th January 2012
Me and my group have found out that we are working towards a tight deadline, so we need to work really hard! It is important that we don't the project but when working towards a tight deadline we need to work to the best of our abilities.
We will all be assigned to different jobs such as editing, so this will make the process more effective if we are all working together. Also if we are assigned to different jobs we can get the project done quicker, meaning that we can focus on further editing and updating our blogs to make it the best we can.
We will be shooting on the 11th January 2012 in the studio at our sixth form. We have booked the studio for our performative chorus scenes which we can hopefully get done within the time slot we have. For our digipacks we were thinking of taking pictures so that we have some guideline for our project and to know what we are working with.
Location


These two pictures show the location outside the studio. This is a girly bedroom and represents being a 'girl' because of it being pink and having a teddy.
Friday, 6 January 2012


Subscribe to:
Comments (Atom)